Wednesday, December 15, 2010

Mad Men Project: Reality Check


So, Mad Men Fashion Project #1 (and part of my holiday wardrobe): circular skirt!

Digging in
I did find some nice full skirt patterns in my vintage pattern stash, but there was always something I was not happy about. I knew I need to be able to manipulate the garment and the best way to go about it is draping it.

Draped it will be
This draping book - Draping: Art and Craftmanship in Fashion Design, by Annette Duburg and Rixt van der Tol – is exactly what I need. (By the way, it seems it was sold out on Amazon and the price is outrageous now.)

It has instructions on how to drape a one-seam circular skirt. With holidays approaching faster than I can handle I need the simplest possible design. I will compensate it with fabric and trimming and choose something special.

The Plan
I want to finish this skirt by Christmas. I will drape it, cut it, sew it, wear it and while I am working on it I will be posting instructions and observations on this blog, so, dear friends, if you want to DRAPE-ALONG please join me.

Small Print
I have never draped in my life! And I have never hosted any drape-along or sew-along! But if I don’t try I will never know, right? Remember, we set our own limits! And if we manage to put together a small drape-along circle I am sure we will learn from each other.

Next Steps
Starting from tonight, I will be posting instructions and comments on the project. We will use the draping textbook as inspiration for this project. Please reply to this post so I know if anyone is interested in it. If yes, I will set up a separate group on Flickrso everyone can upload images and exchange ideas and feedback.

Ok, wish me good luck!

Mad Men Project

I love Med Man fashion. Those early 60s silhouettes with pencil skirts and circular skirts with hems falling right below the knee, slips, petticoats and boned long-line bras, and gridles… I want to own every single piece from this show.


Oh, frabjous 60s!.. And despite the fact  that the show is sometimes seen as sexist, it has had a great impact on today’s fashion. Yet again – just like “Dallas” and “Dynasty” in 80s.

Look at these silhouettes by Louis Vuitton and Prada:


Whatever the answer is, I want to have at least one of those circular skirts! And I haven’t even attempted looking for it in stores. This is going to be my Mad Men Project and I will begin it with one of those circular skirts. 


And if you want to read more about Mad Men Fashion and how it relates to the show's female characters read this post on Fashion in Motion Magazin.

For those who get hooked, read regularly Mad Men Fashion File  

(to be continued)


Tuesday, December 14, 2010

Holiday wardrobe: what can be done in 4 days?

I have almost abandoned my holiday wardrobe dreams, but luckily my machine arrived yesterday evening. Yes,  I am a proud Bernina user!

But, well, I need to catch up on my holiday wardrobe. The flight is on Saturday, I have no day off 'til then and my plans to finish several garments and leather gloves for my husband need dramatic modification.

I did finish one skirt - done completely by hand. Now I do need a blouse or top to go with it. I went through my neatly archived vintage patterns and found this Advance 6068 Sew-Easy pattern.


My plan is to make it from a dark navy silk organza and line it with nude silk chiffon.


 It would be probably faster to do it without lining and use facing only, but I wanted to give this top some body and finish  the armhole and neck openings using decorative binding from the same silk charmeuse.

The size on the pattern is smaller than what I needed, but after measuring the pattern I decided to try it on muslin before making any alterations. I haven't changed a millimeter. Judge yourself:


I don't think I need to alter anything, it looks pretty good. That means I may finish this one in time.

Monday, December 13, 2010

Thou shall be called....

.... Eve!


what else? She is perfect and she is the great grand daughter of the first hemstitch machine. (distant clarification provided in this post)

Does your sewing machine have a name?

Who's Hanspeter Ueltschi?


Now, how many of you know who is Hanspeter Ueltschi?

?

?

??
?

ok, the guy is, actually, the great grandson of the legendary Karl Friedrich Gegauf who invented the hemstitch sewing machine. This event took place in 1893 in Steckborn, a small municipality and the capital of the Swiss canton Thurgau, in a workshop run by brothers Gegauf. 

117 years later and the workshop is still in Steckborn, still run by the same family and still producing some of the world’s best sewing machines.

Look, here is Hanspeter himself wishing me very happy and successful sewing experience:


This masterpiece of Swiss engineering is the Rolex of sewing machines. It is so good that even decades of sewing hardly affect the price of Bernina machines.

The Instruction Manual. Look at it:


Those familiar with the history of graphic design will recognize the Swiss Style (or International Typographic Style). It is omnipresent in this simple brochure: grids, amazing typography… I could go on and on…


Just compare, until recently I had this:

This died after a year of light usage


Merci vilmal, Herr Ueltschi, I really love your  beautiful, perfect Swiss sewing machine.


Solnishko, you are the best husband in the world! Thank you for this wonderful present! I love you!


Jetz isch färtig luschtig! Grüezi mitenand, Uf Wiederluege!

[me buzzing:

You know that it would be untrue
You know that I would be a liar
If I was to say to you
Girl, we couldn't get much higher...

$100 Holiday Gift from Novica

This is a great giveaway cross-posted from one of my favorite blogs Grosgrain. Just follow the link to participate. Good luck!!!

$100 Holiday Gift from Novica

Sunday, December 12, 2010

Couture Pressing Tips: Silk Organza Press Cloth


Just a few months ago I used an old cotton diaper cloth as a press cloth for everything. I would dampen it, place it (mostly) over a pair of wool pants or a jacket and press. While this cloth is good for holding moisture, there are many situations when you should have a special press cloth at hand.

white silk organza
So, back then I would have never thought of using relatively expensive silk organza as a press cloth. I've seen intricate blouses and dresses on runway made of organza, but never sewn with it - it was too sheer and too difficult to control. 

Here's how Claire Schaeffer describes Organza in her 'Fabric Sewing Guide': "Organza is a sheer, plain-weave fabric. Made in silk, rayon, or polyester yarns , it is not as crisp as organdy. It is used for evening wear, children's dresses, blouses, dresses, interfacings, underlining, linings, and facings."

Now, it's one of mine most important fabric staples - I use it a lot for underlining and interfacing. But it is since recently that I learned all the advantages of using 100% Silk Organza  as a press cloth.

When to use it?

Many experts recommend using organza press cloth with silks and lace, because its sheerness makes it convenient to control layers underneath. I also learned that you can use organza for pressing iron-on interfacings (see some helpful hints below).

Why Silk Organza?

Like any other press cloth, it helps avoid shine that appears from over-pressing or pressing directly on the fashion fabric. But what makes silk organza press cloth very convenient is that it is sheer and withstands heat. Just make sure it is 100% silk and not polyester – you don’t want the press cloth to melt and ruin your garment, especially if you are working with expensive fabrics.

Do you need to dampen it?

No, silk organza cloth will not hold moisture well. Also, if you are working with silks, avoid steam iron as the risk of having a water stain on the fashion fabric is relatively high. Some seamstresses recommend using water spray, however, if you decide to use water or steam test it on a scrap fabric first.

Where can you get it?

You can buy it from a sewing supply store or Amazon (I am including a link to a Dritz Silk Organza Press Cloth). Expect to pay about $10 for one press cloth.

However, I recommend making your own press cloth – you can get the size you feel comfortable with, and you can make two press cloths for the price of one. All you need is approximately half a yard (or half a meter) of white or ivory silk organza, which you can get at around $20 per yard. Cut a rectangle of 14”(35cm) by 20”(50cm). Finish the seams if you like with a serger or leave it the way it is. In fact, I have never serged mine.

Tips for using Silk Organza Press Cloth for applying Iron-on Interfacing
(this tip comes from Louise Cutting from Rowenta)

She recommends using a separate Silk Organza Cloth for this purpose. Just write “Iron-on Interfacing” on a border of the cloth to prevent the contact of the interfacing residue with the iron surface. Make sure the writing is up every time you press so the glue residue will always be on the same side of the fabric. 


I will continue posting pressing tips here and compiling an overview of existing tips on my Couture Techniques page on this blog. Any comments and suggestions are welcome, I would love to hear about your experience with pressing and pressing tools.

Wednesday, December 8, 2010

Leather Elbow Patch for Sweaters and Jackets


This month when I was unpacking the last bag with winter clothes, I came across a beautiful lambs wool sweater by Burberry. It belonged to my husband, but he stopped wearing it, because a small portion of the knit on the elbow was damaged.

I am a big fan of leather patches on sleeves and love Ralph Lauren jackets and sweaters with leather patches, so, I thought, I will revive this sweater by adding suede elbow patches.

I went to a notions store in Garment District which carries Dritz leather patches, pre-cut and pre-punched, but they had only two colors, black and beige. So, I decided to go to Mood Fabrics and buy one leather skin (usually between 4 and 7 sq. ft.). I found one for $4,50 per sq. ft. and was able to select a skin that was 5 sq. ft .(Mood doesn’t cut the leather, so you have to buy the entire skin).  Since I work with leather every now and then and am planning a tweed jacket for myself, I had no second thoughts about paying the amount.

This projects takes appr. 2 hours to complete.

MATERIALS:


Tracing wheel (preferably 'needle-point')
Leather sheers or a smaller rotary cutter (don’t use fabric scissors, the leather will dull the blades)
A strong needle (or, preferably, a Glover’s needle)
Buttonhole twist or topstitching thread, preferably 100% polyester , nylon, rayon or waxed silk thread (never use cotton thread, the chemicals used to tan leather destroy the thread)
Leather remnants, little less than 1sq. ft.


TRACING AND MARKING LEATHER PATCH


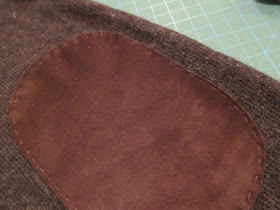
Place the patch template (without cutting) on the leather and trace the cutting line with the tracing wheel. When you remove the template you will see that the right side of the leather has light impression dots. Cut the leather along these dots.

Place the cut-out template for the patch over the leather patch, align the edges and secure the layers with a Scotch tape.

With an awl pierce holes at the start and the end of each dash. When sewing suede, if you put the right side of the leather down, your awl marks/ holes will be more visible providing guides for sewing. The marks are hardly visible once the patch is applied (But be careful with finished leather, each hole will pop out if it is placed incorrectly). Remove the template from the leather.

Place the patch on the sweater sleeve and once you are sure about the exact placement mark the sleeve around the patch with a piece of chalk. (The patch should be covering elbow area on the back of the sleeve)

I recommend putting something sturdy between the layers of the sleeve to make sure that the lower layer is not picked when sewing. I used a medium-size chocolate box.

Stitch the patch following your awl marks. Use running stitch or backstitch, whatever you prefer, and try to sew without moving the sleeve or the patch too much.


Once you are done secure the thread under the patch and, voila, the sleeve is done.

This is just one way of doing it. I hope you will be able to use this tutorial to repair your favorite sweaters.

Tuesday, December 7, 2010

BOOK REVIEW: The Dressmaker's Handbook of Couture Sewing Techniques: Essential Step-by-Step Techniques for Professional Results

I bought this book three month before its release without knowing who the author was or what the contents were. I saw the magic word 'Couture' and put it in my shopping cart.

Here is it: 
The Dressmaker's Handbook of Couture Sewing Techniques: Essential Step-by-Step Techniques for Professional Results

The author is Lynda Maynard (I have never heard of her, but this doesn't mean anything). She has a BA in textiles and clothing from San Jose State University and is an adjunct professor in the fashion design departments of two community colleges and a private design school in the San Francisco Bay area. Apparently she is also an author of the CD book Demystifying Fit.

Nevertheless, my experience with instruction books like this is that it's not about all the titles and affiliations with prestigious organizations but about the commitment of the author to his subject.

So, here you have a very well illustrated and designed handbook for ESSENTIAL couture techniques, not more not less. 

I liked how it is organized:

It starts with a Couture Technique Selector, which is a thumb preview of exactly thirty-nine couture techniques. These are divided into Binding and Finishes, Design Details: On Show, and Design Details: Concealed.

Each technique is accompanied with a number of illustrations and steps. The author also includes so-called Couture Secrets and tips on materials, pressing, construction and style. With my rather patchy knowledge of couture techniques I do see that a lot of information that I have seen scattered across different books dedicated to Couture has been very nicely compiled and presented under individual techniques. 

For example, in a section on Banding V-Neck on Woven Fabric, Ms Maynard says 

"Silk organza is an indispensable  item in the couturier's supply arsenal. Use it to underline and interface garment sections, stabilize curves and angles, tape straight edges, and steady wiggly fabrics for specific procedures."

In Style Suggestion she adds:

" This technique works well on bateau necklines also, since each shoulder seam join functions as a V. try using a contrasting fabric or color, or experiment with bias stripes for added dash."


The part Design Details: On Show includes
Channel-stitched accents
Corded accents 
Petersham "peek" seam
Petersham "peek" on a wrap skirt
Hong Kong finish on the outside
Wide charmeuse hem band
Ribbon-trimmed hem
Decorative trim hem
Flange closure for chiffon
Charmeuse welt edging
Charmeuse welt-edging: add a picot finish
Ribbon-trimmed collar band
Boned cuff
Shoulder Pad (I don't know why this technique is in 'On Show' section)
Button-on garment sections

I especially loved Design Details: Concealed

It includes techniques on

Lining/Binding skirt panels
Couture waistband (I had to re-read this one in Claire Schaeffer's book couple of times to understand)
High-waist couture facing (using boning! how clever)
Easy double-needle hem (for stretch fabrics)
Organza "bubble" hem finish (to prevent hem on skirts and dresses from collapsing)
Faced hem  (great for dresses with longer drapey skirts)
Horsehair braid hem (I wish I could see a garment with such a hem - the effect of this technique is difficult to imagine)
Concealing horsehair braid in the hem
Balanced dart (this technique is widely covered in most books on couture techniques)
Couture dart (the secret of sewing a dart on a machine with only one thread. I remember this technique was covered in Roberta Carr's "Couture: The Art of Fine Sewing" )
Satin pocket bags
Waistline "flip-out" pouch 

The book includes a section on "all the essential equipment for the couture sewer", which included a sewing machine and a serger ( I thought a serger is a no-no in couture sewing?). It goes on to tools like scissors, pins, patternmaking tools and other. Finally it lists pressing equipment. 

I thought this part in the book was not so great since nowhere in the book does the author explain how or where to use many of these tools. 

A section on underlinings/ backings is interesting. I thought, finally, more than a page on underlinings, but, unfortunately the technique of applying underlining is just half a page. But to compensate this, the author gives eight pages with images comparing several combinations of backed and unbacked fabrics, explaining the effect the backing/ underlining has on the fashion fabric. 


Directory of Luxury Fabrics and Trims includes 

Linings - discussing application, practical points for silk crepe de chine and acetate satin. Honestly, what about China Silk, Silk Charmeuse? I hear all the time how Chanel skirt are lined with charmeuse. These were not covered here 

Underlinings describe Rayon Challis, Batiste, Voile, Silk Organza, Cotton Flannel, Muslin, Hair Canvas. 

Charmeuse finally appears under Luxury Fabrics, together with Hammered Satin, Silk Dupioni, Silk Chiffon, Handkerchief Linen, Lightweight Knits, Silk Velvet, Lightweight Wool, Cotton Batiste, Voile, organdy, Silk Gazar and Linen. 

Trims cover applications for Rayon Ribbon, Mousetail, String, Petersham, Yarn, Satin Ribbon, Grosgrain Ribbon, Rattail, Decorative Trim and Decorative Ribbon

To give you my opinion on Fabrics & Trims section, I think you are much better served with  Claire Shaeffer's Fabric Sewing Guide

Maynard's book dedicates its final pages to Essential Couture Techniques (yet again? what about Couture Techniques part that takes up most of the book). She explains how to do French Seam, Spaced Tucks, Hand-Finished Zipper, Underlining, Hanging Loops, Adding Grosgrain Ribbon, Piped Cuff, Shoestring Straps, Buttons, Buttonholes on Sheer Fabric, Snaps, Hand-Bound Buttonhole and two pages on Making a Muslin. The muslin part is somewhat brief and is handled in a by-the-way manner. It could have been explained in more detail at the beginning of the book. Why all these techniques ended up on final few pages is a mystery to me. Nevertheless they are worth learning. 

I know, I have criticized several sections in the book, but I have to say that the main part - those 39 and 12 more techniques hidden toward the end of the book - is really interesting. However, this book is not a substitute for Couture Sewing Techniques by Claire Schaeffer (which covers couture construction process from start to finish) but a great collection of selected techniques. It's a great addition to my library and I will start applying these techniques starting with the next projects. 

What books on Couture Sewing do you recommend?

Saturday, December 4, 2010

Superstitions from the House of Chanel

Before I tell you those, yes, I am on track with my holiday wardrobe, I just need to upload the images so I can post the my last progress report for my polka dot skirt. Hooray, the next one is waiting.

So, the true story.... Yesterday, while I was finishing the belt for my skirt I was watching my favourite Haute-Couture movie 'Signé Chanel'. This is, in my opinion the best movie on Haute Couture for anyone who is interested how a collection is produced. Because I was looking at the screen every now and then, I pricked my fingers many time yesterday. And, voila, in one of the episodes, the amazing Chanel seamstresses offer an explanation to my suffering: Joy at home.... yes....

So let me give you some of the wisdoms they felt comfortable sharing with the camera team:

If a dress falls, it will be liked. 


Couturiers avoid sewing green.

Spilling a box of pins means fight.

Each pricked finger has a meaning. The right hand means work, the left hand means - heart. Pricking your thumb means joy. Then it goes: boredom, love, a letter, a parting.

Dropping scissors means bad news, bad luck, a death - terrible things. Yes, death! Madame Martine, the head seamstress shared a horrible story about one of her colleagues and what happened to her after she dropped scissors a day before....

The only thing you can do is say "I don't care" seven times over your shoulder, to break the curse. The pity is they haven't specified which shoulder, left or right. I guess this would be of importance.

I must admit I am superstitious, so, for the rest of the evening, I was taking good care about scissors trying to prick my left thumb every now and then

Do you have any sewing superstitions?