Showing posts with label Susan Khalje. Show all posts

Wednesday, April 11, 2012

My Couture Challenge: the first project completed!

I keep on talking about my Couture Wardrobe Challenge with BurdaStyle, but have never posted any details about it here, on my blog. I have been guest blogging for BurdaStyle for a while now, mostly covering couture-related topics, and one day, while we were discussing upcoming posts, the idea of creating a small couture wardrobe based on BurdaStyle patterns was born. One style a month, from the most current issue! If you have been following my blog for a while you will know that I am a Burdastyle fan, and have been for looong time. So, it was time I start using all those pattern magazines piling on shelves.

AND, I was very happy that Susan Khalje agreed to be a couture mentor in this project, giving me a few tips on how to handle some challenging parts of each project. These tips are published in a preview post, including some details on planning, fitting and materials. The final garment, as well as an overview of techniques used to complete it, is featured three weeks later.

Image: Emmy Rengfors, Burdastyle
The April project was based on a skirt and a blouse from BurdaStyle Bella Donna feature. Couture techniques in this first post include faced waistband boning and working with Chantilly lace - here are some details (also featured in my Burdastyle blog):

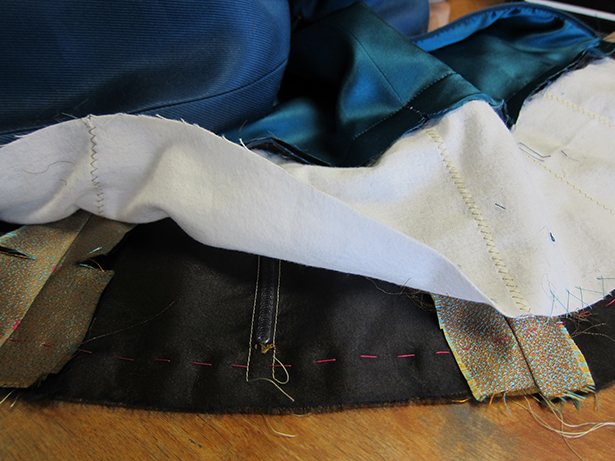

It took me more time than anticipated and so, this time, I have already started working on my May project. Meanwhile the finished April project, including detail shots and techniques, has just been posted on Burdastyle Blog.

BUT before you head over to BurdaStyle to check out the post, I wanted to tell you that I got couple of tutorials and some extras from this first project lined up for you, readers! So, check in the next few days for a detailed how-to and couture tips!!! And thanks for all your support!


Monday, April 2, 2012

Camp Couture: Field dispatch #1

As you may have guessed, dear readers, I was sewing like crazy in the past week, which I spent in an isolated hotel in Baltimore together with several other couture aficionados. We worked day and night, and I was really happy to get some sleep once I was back home.

If you were wondering, packing for this Camp Couture was an exercise in restraint, and I managed to squeeze all my belongings, fabrics, tools and notions into two medium-size bags. I spent half a night carefully selecting every single item and managed to forget only my tracing chalk. And, once in Baltimore, I also skipped a shopping spree at Michael's fabrics, which saved couple of hours of precious sewing time...

Of course, I underestimated time needed to make a couture garment, so a bustier still remains a project-in-planning (PIP). But! I  managed to complete two garments I planned for my Couture Challenge: a skirt (#118B) and a blouse (#126) from the April 2012 issue of BurdaStyle magazine. More on this projects, plus tutorials will come later - this time, I will be treating you to something different! Are you ready?

Susan has kindly agreed to share with you some of her sample couture garments! So I diligently photographed several pieces, including some engineering, construction and finishing shots. I will be posting one garment at a time, with the first one being a dress bodice made of beautiful magenta lace and matching silk (the draping suffered from suitcase storage, but this is less important).

The lace is lined with flesh-colored silk organza. 
Bodice fragment: scallops were applied by hand on armholes and neckline
Inner support is provided by boning, and seam allowances are catch-stitched to the foundation
Bodice close up from the inside
I hope you enjoyed these detail shots, and many thanks to Susan, again, for letting me share these images with you. Stay tuned to more goodies from this class!

Monday, March 5, 2012

Planning for another Camp Couture!

Readers, have I told you that I am going to another couture class with Susan Khalje end of March! It wasn't planned, but in the last minute things just worked out perfectly, and there were/are still couple of seats in the class available. Is anyone from you going as well?


Well, there are a few things I want to work on there:
  • a corselet  that I can wear as a separate piece or under sheer blouses. 
  • a simple Chantilly lace blouse is also on the list, and, finally, 
  • a bias silk slip with lace, which I want to start there
I definitely want to finish two. This time I will need to focus on what I want to accomplish and stick to my plan, so not a single minute of this six-day course is wasted. I am saying this because last time I went to Baltimore I packed a bag full of different projects, fabrics and notions. As a result I had difficulties focusing on a single project... I just didn't spend enough time preparing for the class. I had quite a busy month then and packed without a clear plan.

Ok, I learnt my lesson, and here is what I am going to do! In the week preceding the course, I will
  • make muslins for all three projects, and
  • fit them, so Susan needs to help with final touches only
  • choose the fabric (hopefully from my stash),
  • prepare all the notions I need to complete the projects without wasting time for shopping in the neighbourhood Jo-Ann's,
  • select only essential tools I need for these projects (I tend to drag along too much - not clothes but all the sewing stuff).
I hope this works, as I still participate in the Sew Colette Sew-Along hosted by the charming Sarah of Rhinestones & Telephones and testing the first pattern by Suzy of Suzy Sewing (you go, girl!). Besides that, I am starting a new and very exciting project which may last as long as one year, but more about it later, once all details are in place. All I can say is that projects made in the Couture School will be part of it.

But back to class planning! Have you attended sewing classes? Any tips on how to best prepare for an outside class, besides zillions of other projects, three demanding kids, a husband and bugs that keep the entire family sick all this time? I would accept all the proposals, including meditation, yoga poses and using essence sticks! Please!.. anyone?!


Monday, February 13, 2012

Couture Dress WIP: taming the ease

Readers, as you know, I am working on a couture dress in Susan Khalje's online class on Craftsy.com. I was really excited to be a reviewer for the class, and so I decided to document my work in progress for you. The recommended V8648 arrived this Saturday...

...and yesterday, while marking all the seamlines on the pattern, I discovered an obvious fact.

I am talking about garment ease. Most of you will know that garment ease is the difference between our body measurements and the measurements of the finished garment. Depending on the fabric, garment ease can vary. Logically, the ease would be larger for loose silhouettes; and for fitted clothes made of stretch fabrics the measurements of the finished garment are often even less than body measurements (negative ease).

We know the basics, right? But I rarely bother to check the ease on the pattern. I usually do pattern alterations on a muslin ( I know it's not a good habit, but I am really more of a draper, really. Patterns frustrate me). Well, anyway, yesterday for the first time I paid conscious attention to the measurements on the pattern envelope, and, oh horror!.. Measurements for size 12 were way too small! and I have ordered sizes 6 to 12.

See yourself - the measurements for size 12:
  • Bust: 34" (87cm)
  • Waist: 26 1/2" (67cm)
  • Hip: 36" (92cm)
I don't even remember when I was that slim!!!! High school?

I was horrified because I realized I need some 5 cm (2 inches) more circumference. Grading up would mean more work, and I didn't want to order another pattern - so I went on and measured it. What I found out was that the Size 12 would not only fit snuggly, but it will provide 1 1/2 to 2" ease. How is it possible? The garment is described as a fitted dress. The difference of almost 4" between body measurements and the finished garment is too much, don't you think so?

I wanted to be sure and so, I went to voguepatterns.com and checked their ease chart. Here it is:


Right, 4" ease for a fitted garment!? I don't know why they do it, but I am usually much better off with  less than a half of this (3 cm or so). So, Size 12 would work at the end, but I will need to make sure that all the seams are where they are supposed to be.

Now, readers, are you all more diligent than me? Do you make pattern alterations before you cut into muslin or fashion fabric? What is your 'ease' experience with commercial or indie patterns? Please, leave comments! As for me, I am off to cut my couture dress muslin.

By the way, if you haven't heard of Susan's Couture Dress class, read this post and consider signing up. Craftsy.com was very generous to offer 50% discount to Frabjous Couture readers - don't miss it!

Thursday, January 26, 2012

Couture Dress Class by Susan Khalje: Great offer to my readers!

Hours of streaming video content packed with couture tips and techniques - the new course by Susan Khalje, one of the true couture experts and sought-after teachers, is truly addictive! Hosted by Craftsy.com, the course guides you through the process of making of a couture dress with the help  of step-by-step video lessons and Q&A interaction with the teacher.

I am taking the course,  and what I have seen so far is almost as good as a face-to-face class with Susan. Not only the video, but also the message board contains a wealth of information for couture learners. I won't be going into detail, as I will be posting a sneak peek of the dress-in-progress and the final review later.

But here is the exciting news: Craftsy.com offered a generous 50% off the regular class fee to Frabjous Couture readers! All you need to do is click the badge below and sign up for the class:


I hope you will enjoy the class as much as I do, readers! 

Oh, and more! Susan has kindly agreed to an interview, and so, I want you to be able to ask her questions as well - just post them as a comment below!

Thursday, October 20, 2011

Camp Couture and updates

You may have wondered what I am doing now, readers... I hope.

I am in Baltimore! Taking part in Camp Couture with Susan Khalje, of course. Again... You can't have enough of it, seriously!

I am working on a guipure lace dress with inner foundation and overlay organza dress inspired by this Louis Vuitton SS2012 number.


My lace is grey, however. And, there will be slight modifications to the overlay organza dress. Otherwise, pretty much close tot he look you see.

I spent two days working on my inner foundation and lace dress muslin, went through several fitting and construction steps, which I will be happy to report about once I am back to New York. My old laptop just doesn't want to upload images I took here.

Let me tell you a few words about the dress is going to be constructed.

Inner foundation

The inner foundation is essentially a corselet that extends below the waist, so it not only supports the strapless lace dress but also helps shape the area below the waist. After three kids, you know...

You basically make two corselets out of this cotton and then join the two layers together and treat them as one. Then you stitch two parallel lines 3/8" (1cm) apart for the boning, add hooks and eyes, insert boning and finish the neckline and the hem. Sounds complicated? Chack in for pictures early next week!

The problem is I initially bought matching cotton for inner foundation without realizing it was stretch cotton. And the sales person at the fabric store didn't mention it. I went on and, after three muslin fittings, made the foundation. I laid out one layer on lengthwise grain, and the other on crossgrain, hoping this will prevent the foundation from stretching. Nope... it didn't work. So, I went on today and bought a different non-stretch cotton at Jo-Ann's today. So, now I am going to start the foundation from the scratch - I hope I will finish it by the end of the day tomorrow....

Guipure  dress

Now, the lace will be laid and shaped over silk charmeuse layer, which I decided to back with muslin to give the dress some support and structure. My guipure lace is relatively soft and I wanted to have a crisp look.

Right now, I got peachy charmeuse and muslin cut and basted together, so we can have final fit tomorrow before we lay the guipure lace over the underlining and tuck it to these two layers.

That's my plan for tomorrow.

I promise I will post detailed pictures of what I am doing! If you have any questions about construction of this dress or about inner foundation, post a comment - I would be happy to answer them or to ask Susan if I am not sure.


Wednesday, August 10, 2011

Couture Classes: Sit & Sew Day 3

Welcome back, readers! So, today, it's all about Day 3, which I spent mostly basting underlining to my jacket...

However, I learnt that while men's jackets are entirely interfaced in front (except, of course, for lighter summer versions), women's jackets are often soft tailored, with interfacing covering only center front and the area above the breast and around shoulder. The back support is similar for both sexes. hmm, I guess you knew it already... 

ok, I also decided to underline the jacket, which is not a common thing I understood. Why? I am terrible with my clothes, I let them hang on a chair, throw them on a bed, or any other surface - this is probably because with children I just take care of anything else after I took care of the kids... So, to cut the long story short, I need clothes that are more resistant to wrinkles and that retain their shape despite this disrespectful treatment. Underlining provides exactly what I need and I chose silk organza, so the jacket remains light and soft. Organza complements tweed very well - I love the feel of the two layers. 

For the interfacing, Kenneth recommended very lightweight Hymo hair canvas, which I bought at Steinlauf and Stoller

Finally, I also got my lining cut, for which I chose a solid silk charmeuse from B&J, the only store that had a matching color.  

Cutting and underlining took me entire day, and new demos by Susan and Kenneth were a welcome interruption to this rather monotonous activity.

Corset Demo by Susan


Unrelated remark: see those grey handle scissors? Those are my paper scissors! Never ever come to Kenneth class without paper scissors - he won't take you seriously! I misplaced mine on Day 4 and ended up listening that silicon in paper dulls the blades. And it's true, readers! By the way, the same applies to synthetic fibers. So, if you have expensive tools and sew frequently, listen to Kenneth!

Back to Susan! She showed us where the boning is usually placed in a strapless dress or corset. You can see that the corset has a waist stay, so Susan explained the use of the waist stay. Waist stays take the weight and strain of a garment from a zipper or shoulders. Use waist stay on a strapless dress and never again will you need to pull it up every time it slides down exposing your breasts. For perfect support, use boning, of course.


A waist stay is made of grosgrain ribbon, which is cut slightly shorter than the garment. While the garment would have some ease, the waist stay should fit snugly.

here you can see how waist stay is attached to the corselet

Fly zipper demo by Kenneth

Kenneth showed us this very fast method of putting together a fly zipper. I diligently took pictures of the process, but was not able to remember the steps. It was not complicated at all, but it will require some effort to remember and write it down...


Oh, right, and Devra's project. She wanted to make a vintage dress and bought this amazing italian shirting fabric and matching lining. I think the choice of fabric could not have been better, or?


That's it for today! Hope you enjoyed the post and please leave your comments and questions about the class!

Tuesday, August 9, 2011

Couture Classes: Sit & Sew Day 2

Readers, Day 2 was so much better (mostly because I finally slept). I continued creating paper pattern pieces from my muslin and transferring adjustments we made to the paper. It was very interesting to see how adjustments are made following Kenneth's method. And I really have to learn his moulage technique. Some of the participants made their moulage in the class, and I was soooo jealous! Well, to compensate I asked Kenneth to bring his Moulage eBook, so I could try make it at home. I will just need someone to take accurate measurements for me.

Lotus Flower Demo

In the morning, Kenneth showed us how to make a Lotus Silk Flower - he made it out of muslin though :-). I have no idea where I would use the Lotus Flower but we all Ooh-ed and Aah-ed because it did look cute. You can making it too - Kenneth posted a tutorial on Thread's magazine blog couple of years ago.


Cutting Lace

Then we were for a treat from Susan! She showed us how she cuts lace, this lace was for one of the participant's project. With lace you want to match as accurately as possible to achieve the best look! With  many projects flower details are thread-traced around them instead of tracing following straight (or curved) lines on the pattern. Those extended details are then appliqued on the adjacent piece... we should  make a lace garment together.


To be able to position pattern pieces accurately, Susan showed us her trick. After she took the fitted muslin apart, she placed it underneath the lace, which was then pinned to the muslin pieces. Then, the lace is cut and thread-traced, ready to be assembled.


The day passed by very fast, and then, when I was ready to leave, guess who came by to say hello? Gretchen (or Gertie). Ann invited us for a drink in her hotel in the Garment District, and then another one downtown and... I thought it was so nice to meet all these wonderful people - at the beginning I was blogging in a vacuum - I knew nobody and I really wanted to connect to like-minded people and here you go. Gertie's and Ann's blogs were first blogs I was looking forward to read every time I came home after work when I just started. And now I am sitting with them on a rooftop terrace in the Garment District. Love sewing and love the sewing community - we are the nicest, most helpful and peaceful people on earth!

from left to right: Ann of Gorgeous Things and Gorgeous Fabrics, Gretchen of Gertie's New Blog for Better Sewing and Devra, our class participant and vintage aficionado! I was trying to convince Devra to start blogging...

Right?!

Monday, August 8, 2011

Couture Classes: Sit & Sew Day 1

This was another class with Susan Khalje, and with – new for me – Kenneth D. King. I did take online classes with Kenneth and was very impressed how resourceful he is, and how innovative are his techniques (all the relevant links are at the end of this post).

I joined this four-day class, which took place in New York’s garment district studio, hoping to start a tweed suit inspired by Burberry’s suit from his AW 2011 collection. The idea was to have one well-fitted pant muslin, as well as to learn more about custom tailoring techniques for ladies’ jackets.

Guipure skirt

Susan showed us her guipure skirt and explained us some construction techniques.


The skirt that she showed us was surprisingly soft. It was constructed in several layers: guipure lace on top, charmeuse under it to give it a color background and some shine. Charmeuse was underlined with lightweight cotton; the guipure lace was tucked in regular intervals to this underlined charmeuse. Silk lining was the last layer. Despite these four layers, the skirt was surprisingly light and soft.

Those who have Thread Archives DVD can read more about the construction of this skirt “Amazing Lace” by Susan Khalje (Issue #124)

Embelishments

Kenneth showed us a demo for one of his signature embellishments


The projects

For the whole day we were busy fitting and re-fitting muslins for projects we wanted to fit.  The group was great, and the projects were exciting: a lace jacket, moulage, coat, dress, pants, my tailored suit, corset, leather pouch and more.


For the traditional Show & Tell session we brought in projects we accomplished with Susan before: Ann (yes, The Ann from Gorgeous Fabrics) brough her Chanel(-inspired) jacket and her lace corset; I had my Chanel(-inspired) jacket and the LBD from the online class on Pattern Review; and Debra showed us her retro-inspired Pucci coat. We all Ohh-ed and Ahh-ed and got on our work again.


Ann of Gorgeous Fabrics (see link below) showed us her Chanel (-inspired) Jacket

Cloning a garment

In between, Kenneth showed Debra how to clone a blouse, using a piece of silk organza. He offers an online garment cloning course on Pattern Review, so check it out – it’s really good.


I love these courses because it’s so much fun to sew in a group. Both, Kenenth and Susan are so great, helpful, always smiling, always willing to explain…

Kenneth even modeled his jeans for me, here:

… and we had time to stitch and bitch, of course:


The only annoying thing was the space: sewing machines were placed too close to each other and there were only four cutting tables. The space was somewhat cluttered and we could not work beyond the studio opening hours (from 9:30 to 5:30). With lunch breaks and some shopping, that gave us only around 25 hours to sew. This is one of the reason’s why I loved the Baltimore class more! The latter was truly a couture boot camp and I could focus entirely on my project.


My suit


Readers, I spent the whole first day transferring muslin markings to paper. Since tailoring is Kenneth’s specialty and he does it this way, he insisted I do it.  And, even though I complained a lot at the beginning, at the end, it was a good idea, because it was much easier to draft lining and interfacing pieces from paper pattern and also to make alterations by cutting, slashing, pasting etc… However, I haven’t touched my fabric for the whole day, I hope it will be cut by the end of the class.

I was also much slower than usual. The day before, on Wednesday, I went to Alexander McQueen exhibition and the choice was: McQueen or muslin making. I chose McQueen, naturally, an spend whole night before the course making the jacket muslin, and another half a day making a pants muslin… phew

Check out these links:
Susan Khalje website: http://susankhalje.com
Kenneth D. King website http://www.kennethdking.com
Kenneth D. King book: Cool Couture
Pattern Review online classes
Gorgeous Fabrics store website

Wednesday, August 3, 2011

I'm back and up to a new couture class!

Friends, thank you for your patience! It's finally over, the old job and all the associated stress! We also celebrated my daughter's 2-year birthday and enjoyed a day on the beach. Monday and Tuesday passed running errands, and so it's Wednesday and I am wondering how come I thought I would have more time once I am not working anymore?

Another thing I have noticed it's extremely difficult to get into the exercise of writing daily after such a break. The problem is actually, I got to much to write about and don't know where to start. Well, I will make it a lazy transition for myself and for you by making some exciting announcements.

So, here is a spoiler alert, readers!

... I am starting another course with Susan Khalje and Kenneth King TOMORROW - their great Sit & Sew in New York. So, get ready for another course diary and my work-in-progress. What am I going to sew? I am still deciding! Irresponsible, right? yes, since I have to make a muslin before, hmm... I am tending toward a tailored tweed suit. What do you think? (I really wanted to incorporate some boning project, but... it just doesn't really work with anything I planned for the next season)

Decision made - here is my inspiration:


I do want to incorporate some burgundy red in it, maybe leather, and make the jacket slightly longer... While this Burberry suit is ready-to-wear, what I am really looking forward to is couture tailoring techniques for the jacket. Susan was saying in her French Jacket Course that couture uses soft tailoring techniques, which are very different from RTW. I want something that is not stiff, but I believe some support will be needed for the breast area and for the collar. We used organza to support a small area  above the breast in our French Jacket class... but this one can be completely different. After all, Chanel jacket techniques are specific for loosely woven fabrics and bouclés. Let's see!

As for pants, in the class, I will be doing only a muslin and finish the pants later. Having Kenneth fit the pants is a dream come true. I  want to have one great fitted straight leg pant muslin that I can use for all other pants, shorts, etc.

The course will last four days and I know it's not enough to finish this project, but I hope to get the jacket far enough to be able to finish it without any guidance. So, get ready for some couture sewing reporting!

I missed you very much, I must admit! :-) 

Thursday, June 23, 2011

70 Hours to the Dream: my new Burdastyle blog post!

Dear readers, if you are still not tired of the Classic French Jacket Class, please read this Guest Post on Burdastyle.com!

Burdastyle

I am blogging on Burdastyle every two weeks, sharing my experiences (and failures) in learning couture sewing. If you have any suggestions for next topics, I would love to hear them! I will be happy to research, try and write about anything couture - the more challenging, the better! :-)

Wednesday, June 22, 2011

My Chanel-inspired Jacket: The pics

Readers, I have promised you pictures of the finished Chanel-inspired jacket. I didn't have an opportunity to wear it - so I hope you will forgive me that I am not modelling it and showing it in action. Once the heat is over, I will post the update.  The good news is - I am starting a new one - stay tuned to new updates. But for now, enjoy the pictures! 

I would love to hear your feedback, so please comment!


Day 1: NYC Shopping | Day 2: Show & Tell / Quilting | Day 3: Goodies and Seams | Day 4: Epic Sleeves | Day 5: More Epic Sleeves | Day 6: The Finale |

Monday, June 13, 2011

Meet my fitting companion... and the scavenger hunt challenge!

I am done with assembling my muslin for the first LBD fitting (the picture is at the end of the post), but before we proceed to the mystery challenge, I thought I need to share with you something I found extremely valuable throughout my fitting experience (ok, I admit, my fitting experience is a work-in-progress thing). Nevertheless,..


...meet my fitting companion, this Moleskine notebook. It is my best friend when it comes to fitting! And if you want to have one too, here are some suggestions on how to use it:
  • Get yourself a nice notebook in an appealing color (I love Moleskines, for example, and if I pick a nice color like red or hot pink, it motivates me to use the notebook more often). So, from now on, this notebook will be your fitting reference!
  • Every time you make a new note, write down the date.
  • Take your measurements and write them down (don’t forget the date!). 
  • Before fitting, put on your regular undergarments (be daring! treat yourself to some very nice underwear). Now, take a picture of yourself from all sides: front, back, left side, right side. The point is to take a look at yourself and your irregularities from a different prospective. I was surprised how much more I discovered through such a picture. Next, paste it on the first page of your fitting notebook (you can also write a note: “I love my body!” - I did - or be even more specific about what you love about your body most!)
  • Now, whenever you fit a garment, take pictures from all sides and paste them in the notebook. Make notes, doodle, have fun!  
  • Next to the pictures, make a note of what adjustments you made and how. Most likely, you will need the same adjustment many times, so why reinventing the wheel.
  • Store you fitted muslins and reference them in your notebook for any similar designs. 
And, finally, my LBD in pre-fitted stage (however, after some crazy adjustments - the pattern was two sizes smaller). 


By the way, please feel free to critique the muslin: the more comments, the merrier! I am in the process of refitting it, and I would love to read what you think. Some comments on fitting are already there, now it's your turn! Treat it as a scavenger hunt challenge! And, please-please-please, no "it looks great" comments - we want to learn together, right? 

Monday, June 6, 2011

My Little Black Dress- the beginnings

Dear readers!

After the whole Chanel-inspired jacket epic you have probably realized that I am obsessed about taking sewing classes. The ‘problem’ is the more I sew, the more questions I have.

It’s not even two weeks since I have come back from the Classic French Jacket Class and I am already taking another one – The Little Black Dress Class with Susan Khalje (again).  The comforting thought is I am not the only one – some of the other French Jacket Class participants are taking this class as well,

You may ask how it works with a job and a family… So, the answer is it’s an online class, offered through PatternReview.com. The beauty of these classes is that you can learn from home and schedule your time accordingly. The class is also significantly cheaper than any comparable face-to-face class, but you need to be really organized and focused to benefit from these classes.


The instruction works as a combination of PDF downloads, four live chats with the teacher and a message board. Last online class I took generated over 60 pages on the message board – imagine how much you can learn just by reading it!

I selected this Vogue Couturier pattern from 1959. The pattern is almost two sizes smaller than I need, so I will be grading it up, but I will be doing it on a form. By the way, this is another example of how the sizing has changed over the last 50 years within the same company.  I am a size 12 with current Vogue Patterns, but this one runs almost two sizes smaller.


One great thing about vintage Vogue Couturier patterns ( not sure, however, whether it's true for all of them) is that both, the sewing lines and the seam allowances are marked. That means I didn't have to draw stitching lines like on contemporary patterns.

The fabric I chose is black cotton eyelet, which will be underlined with contrasting tan batiste and lined with crepe de chine. This should make a great summer staple that I can wear both to work and to a night out (not that I have many of the latter!). The image below is somewhat purplish, I was taking it late evening.


This fabric has a border, which may prove a little challenging to underline and to hem. Also, I may try making a waist stay. As usual, I will be posting some couture techniques I used on this blog, and feature the finished garment of course (keep your fingers crossed! I hope the dress will turn out the way I want it) . 

Have you taken any online sewing classes? What was your experience?

Sunday, June 5, 2011

Classic French Jacket Class: Day 6 (the Finale)

It's my last day, or half a day, to be precise. Tomorrow, I need to get back to work, and so, I need to be back in New York this evening. 

it's 9:00 a.m. I am back to the classroom and join my classmates who are busy finishing their jackets. I am  taking a bus to New York with Rosie today and need to accomplish as much as possible by 2:00. When I try on my jacket, Susan point outs that both center front edges are a little bit too long. I have to take in 1/4" on both ends of the hem. Not happy about another alteration, but I want my jacket to be as perfect as possible, so I unpick, alter and clean up the hem. Also managed to attach another trim section - did I tell you that I didn't have enough trim to run all the way around the jacket hem - M&J had some 3.5 yards only. Finally, on Day 5 I found a way to place it so I had enough. I bought some more needles, pins and sleeve pads from Susan and am now off to pack my bags.


12:00 p.m. I am back with bags. I have accumulated an additional bag over the week - how does it happen?.. Meanwhile, Rosie is checking out pockets on her jacket. Are these pockets supposed to be functional?


12:30 p.m. Before we leave, Susan shows us how to choose and apply the chain.  Rosie's jacket gets a golden chain, while I pick a silver one.


This is a chain from the jacket featured in Threads Magazine, Issue 121.
See, how each link is secured twice with a double-strength waxed thread!

Susan gives us additional tips on how to make a grosgrain waistband for a matching skirt. She points at a section in her Linen and Cotton book, where she describes in detail the technique. I am happy I got the book (it's one of my favourite reference books on couture sewing, by the way).


2:00 p.m. just before we leave I take this picture of Peggy's lining. Isn't this fabric gorgeous?


2:30 p.m. Our cab has arrived and everyone helps to carry a bag. We get apples to eat on the way home -  hugs and promises to exchange pictures of finished jackets!

On the way, I am thinking of what else needs to be done until the jacket is finished:

- resew the hooks (yes, again, because I was too lazy and stabilized the eyes only)
- finish the hem
- clean-up the remaining sleeve vent
- attach the trim
- attach the chain
- final press (steam only)

Once in New York, I give Rosie a big hug, while she promises to take me to a new dumpling place in Midtown, where we both work. It feels like a new stage in my life and it's very welcome.

Now, back to you, dear readers. I still owe you images of the finished jacket - please give me another day  - right now my face is red, and my nose is swollen from the flu that doesn't seem to end. And I would like to model the jacket for you!

And, finally, there is another, final post on this jacket and the class that will come some time this week to summarize the experience and to share with you a few great tips from Susan! But more about it later!

(to be continued)
 
Fashion Design © 2012 | All Rights Reserved | About | Privacy Policy | RSS Feed