-->

Tuesday, November 29, 2011

Trouser seam finish: to hand overcast or not?

Hi, readers! Kids are delivered to respective educational institutions after demanding double attention yesterday, and I finally got some time to share with you! Yay!

This U.F.O. celebration worked so far, my cape is finished! Now, I could not make up my mind which project to tackle next - that's always my problem. I wish I had a wardrobe full of beautiful hand-made clothes, but, alas...

So, at the end, I settled with my Clovers. Remember, it was a bonus project for Colette Fall Palette Challenge. Hmmm... So far, I have been working on bonus projects only, not on the planned ones. But, on the other hand, I do need an extra pair or two of trousers, so here we go.

The muslin was done long ago, fabric cut, pants underlined. What slowed me down is the decision on how to finish the seams. You know me, I love to use couture techniques - so, my initial thought was to hand overcast the seams. Crazy, right?

I checked David Page Coffin's Making Trousers for Men & Women: A Multimedia Sewing Workshop - he has a great chapter at the beginning 'Learning from Custom and Ready-to-Wear Garments'. And, of course, what I found there? YSL couture pants from Claire Shaeffer's collection!!! Naturally, all seam allowances were hand overcast... But I just wasn't ready for hand overcasting some five yards of seams with winter approaching soon.... I thought, those YSL pants are vintage - do they really still hand overcast? The answer is, most likely, yes, readers... (I've seen it in documentaries - but I tried to suppress it) So, I was still looking for faster solution. I feel really, really guilty about it!

Let me explain, readers! Hand overcasting considerably reduces bulk and stiffness of the seam edge, which is, obviously, an advantage as it won't show through on lighter weight fabrics, or leave an impression after pressing. However, my trousers, are made of medium-weight stretch tweed, and are underlined, so bulk is a relative issue. Stiffness, maybe.

I went further and paid a mandatory visit to The Cutter & Tailor forum for some advice. I mean who would know better than a bunch of best custom tailors?! There was a discussion on seam finishes, and I finally found what I was looking for.

Is sewing too trivial for a suspense moment, readers?.. Ta-da-da-DAM!

...Anyway,.. I decided to go for serging {Did I say the s* word?} Sorry!.. well, yes, s*rging! However, I used fine silk thread instead of the bulkier polyester. It made soo much difference. It's not as pure (forgive me) as hand overcasting, but it is only tiny little bit bulky and only somewhat stiff.

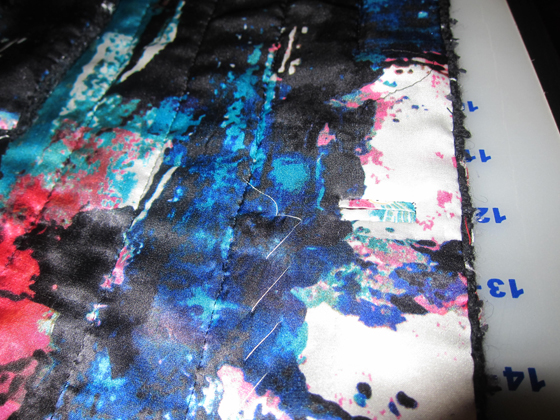
Of course, it took me several samples to adjust the tension - the thread was breaking all the time. At the end, I got it. Here is the proof:

well, the face side is not that visible, but what's more important is that it's not bulky or stiff.
To conclude, I just wanted to say that I would have chosen hand overcasting the pants if I had more time. Purist or not, to me it seems to be a better finish!

Now, back to you, readers! How do you finish pant seams? What are the pros and cons of your method?

Sunday, November 27, 2011

(U.)F.O. Party - Week 2

Dear Readers, this post is shorter than intended as, again, children having cold... That means shorter posts for the upcoming couple of days, sorry, but, meanwhile, let me give you a brief overview of the (U.)F.O. Party last week. Three finished projects out of five, readers! Personally, your submissions motivated me to finish my own project ;-) so, join along!

A more detailed account of projects is below the link submission tool - they all are worth checking out!


If you want to read the original post that started it all, and get a badge - follow this link.

FINISHED - Juliette of  Sewing and Style Den finished her Simplicity 2568 'wearable muslin' to find out that the style of the blouse doesn't suit her well. Someone else got the blouse and she got to try out a blind hem foot. Read her post to find out more. By the way, I am a big fan of Juliette's blog - I think we both started blogging at the same time.

ON HOLD - Another Sewing Scientist posted her unfinished Laotian Silk Brocade skirt. Beautiful fabric, check it out! And if you love ethnic prints, you will find a lot of projects on her blog.

FINISHED - And check out Puu's (un)finished Butterfly Dress! It is made of a beautiful Silk Print by Etro. If you'll read one of her more recent entries, you will see that the dress is finished and is gorgeous. With a lot of hand sewing, print matching and fine couture techniques it's a treat.

FINISHED - I also made my humble contribution by posting my multiple week project a Bouclé cape with quilted lining. Yay, readers, it's now finished! I've documented the progress in different posts, so if you are interested in Chanel techniques, check it out and judge yourself. For me, it was an amazing learning experience!

ALMOST FINISHED - And you have to see the Vogue 2960 Dress from Greytone of this very new blog Gotcha Covered. The hem finish on the petticoat made with fashion fabric bias binding is a very sweet detail. Very little left to complete the project, so let's encourage Greytone to finish the dress by visiting the blog and leaving a comment!

Good luck, everyone, with your UFOs and looking forward to another productive sewing week!

Friday, November 25, 2011

Gadgetmania Giveaway - The Original "How much Fabric?" cards

The Holiday Season has officially started, readers! And so the search for a perfect gift! So, today, as a part of Gadgetmania series, wonderful Gwen of Gwynhug.com is offerring Frabjous Couture readers all over the world a great holiday gift giveaway – The Original “How Much Fabric?” Reference Cards!


A beautiful fabric catches your eye and steals your heart – you must have some! But, how much should you buy? 
"Basically, I always used to way-overbuy fabric and I finally decided that I needed to put a stop to that," said Gwen, "so, with the help of a friend, I entered the fabric requirements tables from thousands of sewing patterns into spreadsheets and created these cards."  
These sturdy plastic reference cards – the perfect size to slip into your purse – summarize the fabric requirements of thousands of patterns with tables and images to help you buy just the right amount. There are tables showing the minimum, average and maximum fabric requirements for dresses, tops, skirts, pants and jackets – broken down by garment size and fabric width. 

The cards also include sketches that illustrate minimum, average and maximum garments, and “safety margin” tables to guide you in “rounding up” to be as safe as you want, without wastefully overbuying.

The following four sets are currently available in both American and metric versions:

Set 1: Women’s Clothes (6-22/Eur 32-48)
Set 2: Plus Sizes (18-32/Eur 44-58)
Set 3: Men’s Clothes (34-50/Eur 44-60)
Set 4: Babies and Toddlers (Newborn - 6)
Set 5: Children's Clothes (7-16)


Gwyn Hug is a small business built from the combined efforts of four sewing friends. 
To enter the giveaway, leave a comment by Friday, 12 December, answering the following question and stating your choice of the cards (Set 1, 2, 3 or 4).  
How do you decide how much fabric to buy, when you don’t have a pattern in hand?
Don't want to wait? You can order the cards directly from Gwynhug.com

Thursday, November 24, 2011

Happy Thanksgiving!

Image: {Wikimedia Commons}
Thank you for being such a welcoming and wonderful community, for sharing your knowledge and for being there every time I need you!

Happy Thanksgiving, everyone!

Wednesday, November 23, 2011

Shop Small and Support the Garment District on 11/26

Readers, I would like to interrupt my regular blog posts for this announcement from 


Sponsored by American Express, the 2nd annual Small Business Saturday® is a day dedicated to supporting small businesses on one of the busiest shopping weekends of the year.


For details and the list of fabric vendors, head over to Meg's great blog.


You can also support small businesses by shopping onlineCheck out, for example, this Oliver+S page and a special offer . With the Coupon Code SHOPSMALL you will get any paper sewing pattern for $12,50 with the purchase of minimum two patterns. 


And here is the link to the Small Business Saturday Facebook page


If you know of any sewing businesses that participate in Small Business Saturday, post a link! Happy Shopping, everyone!

Tuesday, November 22, 2011

Tested Technique: Chanel faux bound buttonholes

I made them because I wanted a bouclé cape with real buttonholes instead of the easier hook and eye. A hand-worked buttonhole is made on the face fabric (= bouclé), and a faux bound buttonhole is done on the lining, which extends to the edge of the jacket.
On the left, the hand-worked buttonhole (temporarily secured with a silk thread)
On the right, the faux bound buttonhole
Claire Shaeffer is the only one who describes this technique en detail - see the end of this post for available sources. So, I followed her instruction, changing a few things, which I thought made sense to me. Here I am describing how I did it. 

Time spent: appr. 30 min per buttonhole (2 hours in total)

Materials used:
  • silk thread for basting
  • polyester thread for permanent stitching
  • longer Japanese needles for basting
  • shorter Japanese needles for permanent stitching
  • Iron
Techniques:
  • running stitch
  • slip stitch
THE STEPS:

1. Prepare buttonhole welts


To prepare buttonhole welts, tear couple of 1 inch (2.5 cm) - wide strips of lining remnants on crossgrain. If your fabric doesn't allow tearing then cut on grain. 

I find that tearing the strips not only precisely establishes the grain, but also simplifies pressing and aligning of the strips in the following steps. 

You will need 2 welts for each buttonhole, and to establish the welt length use the following formula:

welt length = buttonhole length + 1" (2.5) seam allowance

Don't cut your stripes into welts yet, just use this formula to establish the total length you will need. it will save you some time. 

2. Press welts

Press your stripes to flatten the torn edge. Fold stripes in half, wrong sides together, and press them again. 

3. Cut welts


Now cut the welts in the required length using the formula above. 

4. Place the welts on the face fabric


It helps, before you do this step, to secure the hand-worked buttonhole on the face fabric (image above). This will minimize shifting of the fabric layers and allow you to align the welts faster.


Place the welts on the wrong side of the garment, with folds facing each other along the buttonhole centerline. It helps if the line is thread traced on the face fabric - it is usually done before the hand-worked buttonholes are applied. This thread-traced line should extend more than 1/2 inch on each side to serve as a guide. 


Using a small running stitch, permanently stitch the welts to the face fabric.

5. Finish lining

Lay the lining over the buttonholes and finish it. Usually, in this type of garment, where lining is quilted to the face fabric, it extends almost to the edge, and is finished using fell-stitches. 

6. Secure lining around buttonholes

Here you see how I basted around the buttonhole (from the right side of the garment) and, then, outlined the buttonholes lines (Step 7)
Before you proceed, you will need to secure the lining in place - this will allow you to cut the buttonhole with minimal shifting. To secure the lining baste around the buttonhole using a running stitch. Silk thread is the best, of course, since it doesn't leave marks on lining. 

This is where the easy part ends, readers. You will need to be extra focused 

7. Clip the lining 

As next, Claire Shaeffer advises to "carefully mark the ends of the buttonhole with pins and carefully clip between the pins, and another 1/16 inch at each end."

Be careful here! Since you basted the lining to the face fabric you have no control over the welts sandwiched in between, so, you have to be extremely careful about not clipping the welts accidentally. 

When  I did the trial buttonhole, I clipped the center line wrong, so it was off. With the next buttonhole, I used an air-erasable marker to draw the center line and the outlines.

8. Finish the buttonhole


To finish the buttonhole you will need to carefully turn under the buttonhole edges appr. 1/8 inch from the centerline and slipstitch the folded edges to the welts. This is probably the most demanding step as it requires very accurate folding and stitching. 

I would recommend using a smaller hand sewing needle and going around the buttonhole twice - this way you don't have to make too tiny stitches. Claire Shaeffer also recommend using needle point to shape the buttonhole corners. 

By the way, you can see that my buttonhole welts are wider than 1/8 inch. I just thought this would work best for me, mainly because I used relatively large buttons, so the buttonhole length is slightly more than an inch. I think solid color would look better with narrower welts. 

It is virtually impossible to achieve perfect rectangular shape with charmeuse, because it is so slippery and frays the moment you touch it. Now, I think fusing around the lining around the buttonhole may help control the silk. However, with silk, I would be extra careful about it and make a sample first. I would also secure the corners with a couple of narrow overcast stitches, because those sections are under the stress every time you (un)button the jacket.


So, that's it readers! 

Am I happy with the outcome? 

Well,  I wish the result was better, but then I looked at pictures of vintage couture Chanel jackets available on Shaeffer's DVD "Behind the Seams: Shaeffer on Chanel". Readers, hand-worked buttonholes look better than mine, but not better than Jefferey D.'s. However, the faux bound buttonholes are often a mess, at least judging by those pictures - I think, with some experimenting it is possible to achieve better results. 

The verdict:

Shaeffer's technique is the most suitable technique for bouclé jackets. Finishing part is really awkward, but if you are a patient person and don't mind going slowly about it, you will get quite good buttonhole. 

Some tips on how to make it look even better:

Mastering hand-worked buttonholes is important for the overall outcome. However, I also realized that bouclé hides a lot of imperfections. Choosing silk thread for the face fabric will blend threads even more. Using quality beeswax helps as well, as the thread will look less dull. 

With the faux bound buttonholes, I thought that print charmeuse (instead of the solid color) is more forgiving, especially if it is an abstract print like mine. 

Finally, applying some pressure to the buttonhole with the tip of an iron makes it look better.

As for the cape, it is now finished, yay! I may also apply chain to weight it in front, because it pulls back slightly, maybe because of the heavier slit on the back. I am still not decided on it... Will be posting the pictures of the finished cape this week, readers!

Here are some sources I used as a reference:

V8259 - highly coveted jacket pattern by Claire Shaeffer Custom Couture (inspired by a strikingly similar vintage couture Chanel jacket). Construction technique include quilting and a three-piece sleeve.
"The Comfortable Side of Couture: Practical Techniques of Coco Chanel" by Claire Shaeffer in "Great Sewn Clothes", Threads publication - describes construction techniques of a typical couture Chanel jacket
"The Comfortable Side of Couture:Practical Techniques of Coco Chanel" by Claire Shaeffer in Threads Magazine Archive, Issue 23, June/July 1989
"Behind the Seams: The Shaeffer Collection" by Claire Shaeffer and David Page Coffin, 2009 - a collection of images documenting construction of Chanel Haute Couture and RTW garments.

What about your buttonholes? Have you tried buttonholes on bouclé, or any other loosely woven fabrics. I am wondering what other options are there... as always post links to relevant posts, projects, tutorials!

Are blog tutorials to be trusted?

Just recently, I have stumbled upon a comment on one sewing blog that made me think about the quality of sewing tutorials, so abundant in the sewing blogosphere.


But first, the disclaimer: I realize, I may upset a few people by quoting a part of the comment here, but I hope the majority of you will agree that it is actually a positive thing because it triggers interesting debates on relevant issues.

Anyway, here is the quote:
It only annoys me because of the many examples of tutorials that are really popular but frankly really ill-informed. And it guts me that people searching for a tutorial on how to do something may latch onto one of these - and think it is a good way to do it when it is harder, less accurate, or otherwise flawed - simply because of who wrote it or how many hits it had had.
So, on the one hand, I agree - there are a few not-so-great tutorials, on the other hand, I think, blog readers should be aware that blog tutorials are nothing else but the author’s way to do it – try it or leave it.

Here are some clues that help me use blog tutorials successfully:

1. Check out the final result

Honestly, I have never had a problem with online tutorials. For example, I saw several ones on hand-worked buttonholes – some had more information, others were basic… But what really counted for me was the final result. Did I like the buttonhole? If yes – I tried to follow the writer’s instructions. It didn’t work out even after some practice? I did more research. 

2. Compare several tutorials, on blogs or in books

One thing I always do is look at several tutorials on the same topic and compare. With my buttonholes, I achieved the best results combining three sources, Jeffery D.’s video tutorial, Cutter & Tailor forum info, and Paco Peralta’s tutorial on his blog (the links)

3. Look for personal experience

I also feel that even if the tutorial is less accurate, you will very likely find some invaluable personal experience that makes blog tutorials so different from sewing books instructions. 

4. Look for references.

References to additional resources are always a good sign - for me, it is an indication that the writer made a research and compared different ways to do something.  

Finally, we are all learning by doing, right? I appreciate the time bloggers invest into tutorial writing, whether good or bad. So, even if I didn't like something, I would always come back and check new tutorials by the same person. 

Post factum edit :-) I also wanted to add that, sometimes, it is the blogger personality, his or her wit, or the garment they made, that inspire a reader to try out a technique - I think this makes blogs a very educative medium that helps spread the word about the craft we all love!

So, readers, what do you think about blog tutorials? Are they to be trusted? What makes a good tutorial for you? Which bloggers out there would you recommend for well-written and thoroughly researched tutorials? 

Ok, having said all of that, there is a tutorial in making on Chanel faux bound buttonholes :-) It is actually more of a review of Claire Shaeffer's technique... I will try to post it tonight, kids permitting ;-)

Monday, November 21, 2011

My labels have arrived!!!

Readers, holding the labels in my hand is like making the next step in my couture adventure.


I know I still have a long and exciting journey ahead of me, but I am already proud of what I have accomplished so far! And, so, I am now documenting that my garments are made by me, by hand, using couture sewing techniques, patiently and passionately!

Do you have your own labels, readers? 

Sunday, November 20, 2011

(U)FO Party - Link your (un)finished project from the last week!


Ok, this is not a Sci-Fi party... And it is also not about United Farmers of Ontario, readers!

It's about showcasing our (un)finished projects? 

Why (UN)finished?

Well, it is great of course if we finish what we planned in time. But, sometimes, the objects are unfinished because we stumble upon a sewing challenge, or work on a complex project (Chanel jacket, anyone?)? Often, even a little step can be a great learning experience for all, a blogger and the readers. Maybe linking to an unfinished project, or a post on such, will remind us about, make us touch it, and maybe even want to finish it? Or, maybe, you finish something that was neglected for a while... A week? Two? maybe more? Two years????!

Whether you will link to a finished or unfinished project, it is more about being more productive (disciplined? yuck). By linking directly to our blog, or image gallery, we will be making this pledge! I hope this new idea will help all of us be more productive more organized and more focused on our sewing projects!

So, this is the first Sunday, grab you link and post it here with the help of the link widget below! All you need to do is to add a URL to your UFO. Just click the link and follow instructions! Real simple, isn’t it?


If you haven't blogged about your (U.)F.O. do it now! To join the (U.)F.O. party link to unfinished objects, work-in-progress, finished stuff - it should be something that took longer than planned! And don't forget to get the badge:


Grab the code below to display the badge on your blog:


For the most dedicated star troopers, here are some tips on how you can spice up your UFO-Party images:

Wear UFO-shaped badges with a little green man at the wheel to create excitement among blog readers for the festivities to come.

Green alien heads can be worn with your UFO. Use foil cutouts to create creepy metallic eyes. 


Creating an alien background is easy with bright green crepe paper that is strung all about the house. If you have children, they can help you decorating foil pie tins to make cute U.F.O.s to hang from the ceiling.

Crepe paper in yellow and black can warn your blog readers of the recent U.F.O.crash site.

Readers can be offered Area 51 staff blog badges to wear throughout the party. They can individualize each with a Polaroid picture of themselves taken as they read your post.

Make an even better alien background by making space pictures on large black poster boards speckled with white for stars and brightly colored spheres for planets.

Brightly colored balloons can be blown up to different sizes and even have colors added to create planets. Hang the planets around the house to create a party solar system. A large yellow balloon can be hung in the center of the room to form the center of your festive universe. (for more inspiration, visit http://boysbirthdaypartyplanner.com/AlienParty.html)

To inspire you even more, here is a video dedicated to all  (not so)supersonic sewers ;-) performed by my most (truly the most) favourite rock band


Enjoy the party! 

Saturday, November 19, 2011

This Week’s Sewing Reveries


This week was all about sewing productivity… or, actually, about the absence of such. 

Source: Flickr Commons
I feel like I have been focusing much more on learning and on the sewing process as such than on getting garments finished. So, this leaves me with 10 UFOs (aka unfinished objects)... {I know some of my loyal readers and friends will sympathize}

Little help with UFOs

Talking about UFOs, do you have any tips to help stay focused on your projects? I thought a plan would help. Not the one in a notebook, but something  public, for more transparency.  A Work-in-Progress widget on my blog (does it actually exist?). Anyway…

Source: Flickr Commons
…finishing projects together is so much more fun!

Wouldn’t it be fun, if we all showcased our finished objects once a week, or whenever they are done. So, I am adding a small widget where you can link to your finished project. Every Sunday, I will be posting a new link collection and you will have a few days to add a URL and an image that will link to your blog or gallery.

What I have accomplished this week…

{I am blushing} … BECAUSE,
  • I spent the week practicing hand-worked buttonholes
  • started a Faux Fur Class with Kenneth D. King on PatternReview and
  • took apart a fox fur jacket I got from my mom (it did need quite a few alterations to become wearable again). I like fur generally, but would rather restyle an older piece than buy a new skin... 
  • guest blogged about Beeswax on Burdastyle, and acquired a collections of beeswax cakes to compare, lol – I need help, readers.
  • tried to re-watch Star Wars on Netflix or Amazon Prime – to no avail, duh. DVDs cost over $100 on Amazon, or you have to subscribe to Netflix DVD service.  That’s the first occasion I wish I had a Blockbuster around the corner.


My plans for the next week…

Errr… finishing UFOs?

So, how does it sound, friends? Shall we start linking up our finished projects? If yes, tomorrow is the start date - I will post the first link widget for everyone to join! 

Friday, November 18, 2011

Sewing Gadgetmania: A Red Dot Design Award winner...

Readers, I am very happy to introduce the first guest blogger: Astrid. Astrid blogs from Denmark at Frøken Hanghøj about sewing, of course. Did you know that "Frøken" means "Miss" in Danish? So, today we are about to read a Gadgetmania post by Miss Hanghøj! 


She got quite a treat for us today: a post on an award-winning sewing tool... By the way, you will need an online translation tool to read her blog, and here is the link to her blog translated by Google into EnglishBut, first, read her Gadgetmania post...


Hi everyone! Marina let me do this blog post as a cultural-exchange post [Marina's disclaimer: this was Astrid's idea! :-)]. I found Marinas blog when I took up sewing again after a long, long break… Reading on all her posts on couture camp makes me so envious that I live too far away to participate – in Denmark.

It also makes me think that the sewing world is completely different from culture to culture. I’ve only sewn here. I’ve been to the US a few times and at one point I even brought a sewing project with me, but didn’t finish one single stitch. Too much to see! Especially in San Francisco which must be my favorite place on earth!

Denmark is well known for Danish design. And pastry (Danish!). And the little mermaid and Hans Christian Andersen. Perhaps if you’re into Scandinavian design, you’ve also heard of quite a few names in Fashion. But our sewing notions? They come from Germany. As with most other things that I buy for sewing. Even my sewing needles say ‘nädlen” in German.

So,.. sorry. This post is looking south (Denmark is located north of Germany on the world map for those who have trouble locating this small country of only around 5 million people).

I’ve picked a sewing notion that I believe is not widely known in the US. I could be mistaken though. It won a 2011 Red Dot Design Award for industry and crafts. Red Dot is a German design publishing bureau. They’re mostly known for awarding the yearly Red Dot design award to industrial design that is both functional and pleasing to the eye. Going through their web store I would like to be able to say “I’d take one of each, please!”

In this post I am introducing you to The Purple Needle Twister. Personally, I would have picked a fancier name for it. But this will do, since it’s official.


[Picture - closed]

I bought it in my favorite local sewing machine shop downtown. For around 12 USD – which is probably a bit overpriced compared to what you’d pay for something similar in the US, but here in Denmark sewing notions don’t go for cheap. Neither do fabric – we’re used to paying around 35USD easily for a scrap of wool boucle. No wonder I often think about going to Turkey or Paris just to go fabric shopping. City-hopping in Europe is a real possibility and if the financial crisis hasn’t gotten to your finances yet – also quite cheap at the moment.

So what does it do? With just a simple magnet it holds all your needles point down and lets you pick and choose the ideal-purpose needle without getting hurt. Like this:


Want to know more, here is a video from Prym, showing the tool in action!


Being someone who carries band aids with her sewing notions, I believe this has already saved me more times than I care to count. And ain’t it fancy? Who doesn’t love purple sewing notions that look like makeup. You can buy it on Red Dots website here [http://en.red-dot.org/2801.html?&cHash=e2d78a8b836d9e2eec2a042e5742466a&detail=8169

Did you enjoy it, readers? I must say I envy Astrid for having access to all these tools! And she said she dreams about having a tomato pincushion! Did you mean one of those, Astrid?


If, yes, than it is already packed and waiting to be mailed to Denmark! 


Back to readers, I could not find the Needle Twister in the US, but got some results on UK eBay when I googled it. If you have seen this notion in the US or Canada, please post a link or more details here!


If you enjoyed this post and also want to contribute to Gadgetmania, send me an email to mvk(dot)fashion(at)gmail(dot)com.


Thursday, November 17, 2011

New BurdaStyle post: Beeswax, the Unsung Notion

Readers, yes, this time I was inspired by... beeswax. If you are asking yourself whether this notion deserves so much attention, check out the post for some tips and useful information! And if you have more to add, please feel free!

Click the badge to read the post on BurdaStyle:

Burdastyle

What about you, where do you use beeswax in sewing?

Tuesday, November 15, 2011

Hand-worked Buttonhole #11

Readers, eleven buttonholes and I feel like I had an intensive Jedi training! Waxed lightsabers and the Force...

here is the result:


I am glad Yoda is not here to make me work another 989 buttonholes, because the next one will be made straight on the cape! (By the way, I know it is far from being perfect, but I got another week of relatively warm weather here and then it's over!)

Now, I wanted to thank all the commenters for being so helpful!

Suzy, you always motivated me and I really suggest you give it another try! These buttonholes get only better with practice.

Sherry, I knew you would be there to comment on yet another sewing challenge - Thanks! Readers, if you don't know Sherry, check out her blog - she hosted a great RTW Tailoring Sew-Along. Besides that, you will find many examples of great garment construction on her blog and tons of tutorials, both on RTW and couture techniques!

By the way, Sherry and Browser, I did find that video by Jeffery D earlier today and it helped a lot! It is probably the only useful video tutorial on hand-worked buttonholes!

AND don't miss this great tutorial by Paco Peralta. Paco, thank you for posting the link. In fact, I was trying to find it on your blog earlier today, but then Marie-Noele mentioned you and, then, you commented!.. Readers, I was sure Paco had something on hand-worked buttonholes - just check out his garments and impeccable construction!..

As for my cape buttonholes, I won't be testing your patience, readers, and won't post any further practice posts. I think I got the feel of it and just need to practice more. But here is one tip that helped me make some progress (of course, I am not including anything you can find in Jeffery's and Paco's tutorials) -

Focus on every stitch, but work it as part of the whole. In typography (I happened to study it), there is a process called kerning where you adjust the spacing between letters so the text looks balanced. Kerning can be tiring as you need to adjust spacing between every letter. Ed Bengiat, a great typographer and my teacher, taught me to look at three letters at a time and adjust space comparing the positive and negative spaces of the neighbouring letters. Now, in buttonholes, when you start working on you stitch, keep in mind how you did the previous one - the length, the space, the tension, everything - and make just exactly the same stitch... and another one... think how it can affect your next stitch... three stitches at a time, no distraction... patience, precision and focus is the key to making progress...


If this tip didn't inspire you, check out this insightful video (yes, I am a big Star Wars fan):


Feel the Force, readers!

My hand-worked buttonholes challenge! Yuck!

Friends, I am in the middle of a self-imposed challenge. As you may have guessed I am challenging myself to hand-worked buttonholes. Can you believe it, my cape... I quilted it using Chanel techniques, hand-felled the lining and attached the chain to make it fall better.... blah-blah-blah

Now, I wanted to have hand-worked buttonholes! Ehm, I've seen a few bloggers / home-sewers like myself, do them... and I must say, (oh forgive me my fellow seamstresses!), I haven't seen anyone who has mastered them... well, authors admit it as well...

In my foolishness, I thought I wax the tread, sew them tidily and post a tutorial here. But, friends, I got three test buttonholes on scraps and here is the result:


Yuck!.. Yuck!.. Yes, and as you can see, I lost patience with the upper edge of the buttonhole!

Yes, and I am waxing! A lot!.. By the way, I am becoming frustrated with the regular wax available for home sewers in stores... what is it, Dritz, I think. (Spoiler alert, readers! Stay tuned to learn about good stuff, it's being now packaged for me...)

Back to buttonholes: I know the basics, those posted elsewhere as well, but what's the point of creating a tute repeating the same stuff as long as the results are less than satisfactory. So, I have plunged into deep research about buttonholes and found some interesting hints. But, most importantly I am practicing and practicing and practicing....

On some forum I read someone mention 1000 buttonholes to become a pro?

Oh, I am not going to post all of those 1000 buttonholes here  just some progress. Will I ever be able to wear my cape this year?

Watch me!

Have you had any experience with hand-worked buttonholes? Post links! 

Sunday, November 13, 2011

Gadgetmania updates and news

Thanks to everyone for responding to the guest blogger proposal! I got quite a few emails from you and am very excited to start the guest blogger series!


In the next few weeks, I hope, we will see posts on patternmaking rulers, fabric swatch tools, threads, needles, scissors, dress forms, and even glue... The latter is not quite a couture tool, but I think it is still interesting to learn how this guest blogger is using it in her sewing! Overall, however, the focus will be on couture sewing and related tools.

Well, I have replied to all contributors. If, by any chance I missed your proposal, please forgive me and send me a brief reminder!

The news is that from now on Gadgetmania posts will also feature couture notions, so I will be merging these two areas. In the course of this year I learned a thing or two about couture notions and am very keen to share it with you! So, stay tuned!

For those who want to contribute, please feel free to contact me at mvk(dot)fashion(at)gmail(dot)com with a line or two about the tool or notion you would like to feature! If you have any requests for the upcoming posts, go ahead, post a comment with your wish :-)


À bientôt, readers!

Saturday, November 12, 2011

Blogiversary Giveaway winners...

Thanks to everyone for entering the giveaways and posting great comments! Here are the winners for all three giveaways:

Giveaway 1: Project Runway Wrist Pincushion
Winner: Suzy of Suzy Sewing

Suzy wrote: "Happy Blogiversary!!! I love watching Project Runway but here in UK in regular channels the newest series never show. I have to wait months and months. I always try to avoid twitter post and blog posts on it as I don't want any spoilers."

Giveaway 2: Claire Shaeffer Custom Couture Pattern V8621
Winner: Marie Noele of La Machine à Coudre


She said: "Happy bloggerversary from http://lamachinacoudre.blogspot.com/ a sewing blog in French and English showcasing the clothes I am sewing for me and the most dear ones to me.
Thank you for the jacket pattern I would love to win it"

Giveaway 3: Burda Style Magazine, Issue November/2011
Winner: Erika of Erika Made It

And Erika said: "My Blog is http://erikamadeit.blogspot.com/
I just posted my latest project, Colette's Sorbetto"

Please send me your address at mvk(dot)fashion(at)gmail(dot)com! 

As for the next post, it will be an update on Gadgetmania Guest Blogging: I was overwhelmed by the response, readers! Thanks to everyone and enjoy the rest of your weekend!

Monday, November 7, 2011

And the winner of the Project Runway Wrist Pincushion is...

Readers, friends, we have the first winner: it is... Suzy! Yay!

Suzy will receive this Project Runway Wrist Pincushion - this is one of the tools I always carry with me - it is so useful!


Suzy said...
Happy Blogiversary!!! I love watching Project Runway but here in UK in regular channels the newest series never show. I have to wait months and months. I always try to avoid twitter post and blog posts on it as I don't want any spoilers.

I blog over at www.suzysewing.blogspot.com and whilst I'm not sure the blog is special to other people (it is to me) I am striving and plotting to make it special. I like to think good photography and interesting finished projects make it special.


Thank you, everyone for participating - here are your comments: make sure you read them all - you may find one or more new blogs to follow!

Astrid  of said...

I'm undecided on project runway. It falls somewhere In between educational and guilty pleasure (the type that ends up a bit nauseous). What makes my blog different? It's in Danish and you'll need a babel fish to read it :-) What makes it special? Honestly, I don't think it is. At least not compared to the international sewing blog scene. But most of the Danish sewing blogs are about children's stuff. And mine is not. Not at all.

House of Pinheiro said...
Happy Blogversary ! Ohh how I love a party ! And my post today was the result of lots of sewing- placemats,napkin and even a matching cake.
On www.houseofpinheiro.blogspot.com I keep my crafts and musings open to all sewist and crafters in the hope its inpires people that same way I feel inspired by Marina and other great blogs.

Sandi said...
Project Runway is one of the few TV shows I must see - even though I was disappointed in the most recent season's ending. I think the all-star PR coming this winter will be great, though!

I have a blog that is a mix of sewing for kids (boys & a girl), sewing for me, home dec, even sewing for hubby on occasion. I sew with everything from the big 4 to boutique designer patterns to foreign and foreign language patterns.

joen said...
Happy Blogaversary!! I do not have a blog of my own (maybe in the future) but I have enjoyed reading your blog and my goal has been to learn couture techniques and add to my sewing knowledge so thank you for all your inspiration and know how!

dragicap said...
Happy Blogaversary! I love sew,but I love crochet ,knitting and all handmade products,with good idea and with love. I have my blog ...made by me ...

Best wishes,Dragica

Sewing Princess said...
Happy anniversary! Well done. My blog is about my sewing and pattermaking journey. It covers women clothing shot in beautiful european scenery. It's bilingual English and Italian. Hope to see you there!
 
Fashion Design © 2012 | All Rights Reserved | About | Privacy Policy | RSS Feed